Don’t let your dog die of paralytic shellfish poisoning

There has been a spate of dog deaths on UK beaches, particularly around the coasts of Norfolk and Suffolk where pets have eaten starfish and other sea creatures washed up on shores in stormy weather.

The cause of death has been pinned down to paralytic shellfish toxins, although as the BBC reports algal blooms are uncommon in winter so the source of the contamination is not known. These toxins are entirely natural compounds, but neurotoxins nevertheless. They are made by certain types of algae, which are then assimilated by shellfish and other sea creatures further up the food chain, rendering otherwise edible animals toxic and potentially lethal. The toxins can cause a very unpleasant death for mammals, including people, in some cases. Indeed, it’s worth noting that these toxins are not destroyed by heat or acids, so cooking contaminated shellfish doesn’t get rid of them.

Among the toxins, perhaps the best known is saxitoxin, the biosynthesis of which I wrote about in 2017 for Chemistry Views magazine. The compound has the following quite hefty chemical name, the structure of saxitoxin is shown at the bottom of this article:

(3aS-(3a-α,4-α,10aR*))-2,6-Diamino-4-(((amino-carbonyl)oxy)methyl)-3a,4,8,9-tetrahydro-1H,10H-pyrrolo(1,2-c)purine-10,10-diol

Anyway, if you’re walking your dog on the beach, make sure they don’t eat anything in the tideline or indeed anything at all washed up or otherwise lying on the shore, you never know what toxic nasties it might contain.

Super blue blood moon

The Moon is up, the sky is still blue, but our eyes have a higher capacity to cope with the dynamic range from the blue to the light than a camera can do…

Anyway, here’s a quick snap of the Moon this evening, it’s waxing gibbous, 94% of the way to full illumination and heading for a Super blue blood moon on Wednesday when it will not only be closest to Earth in its orbit and full (super), second full month in the same month (blue, not as rare as you think), there will also be a lunar eclipse so will look ruddy through backscattering of Earthshine in red wavelengths (blood), although the lunar eclipse will not be seen from the British Isles, so don’t go looking. Nothing to do with astrology, everything to do with astronomy and partly to do with calendar accidents. That said, blue used to be not just the second full in the month, but second in a calendar (church) period.

Meanwhile, camera settings for this shot:

f/5.6
t 1/500s
ISO 100
Focal length 600mm
Cropped from 5472×3648 original to 1087px square

The locust eaters

If you don’t fancy going vegetarian or vegan to save the planet, would you consider becoming an entomophage instead? Billions of people in 4 out of 5 countries around the world have insects as an important part of the daily nutrition. There are almost 2000 edible insect species, they’re high in protein, low in fat. Some estimates suggest that the water, energy, resources and land needed to cultivate sufficient to replace more conventional “livestock” would be a fraction of that we currently use to grow cattle, sheep, pigs, goats etc.

I bought some mealworm (larvae of the mealworm beetle, Tenebrio molitor) to add to the feast on offer to the birds in our garden. Although they smell rather pungently, they are edible to people and I think that they wouldn’t actually be too unpalatable, maybe braised with garlic and ginger, added to fried rice, and with a splash of soy sauce. However, for now, I think I’ll leave the Robins (Erithacus rubecula) to feast on them in the garden. That said, Mrs Sciencebase just noticed that the starlings can also easily get into the makeshift ground-feeding bird shelter (basically, a metal basked) I placed over the platter of mealworm.

Oh, by the way, The Lotus Eaters (aside from being a Scouse 80s indie band) were the race of people in Greek mythology who ate nothing but the fruit and flowers of the lotus plant the narcotic effects of which left them in a permanent state of peaceful apathy, just as we are it seems when it comes to environmental concerns.

I was trying to allude to this apathy in the title of this blog post, but making a play on the fact that maybe we could drag ourselves out of it by dining on locusts instead of ribeye beef steaks? After all, many of us enjoy shrimp, and they’re more closely related to grasshoppers than cows…

Cutting noise from photos

UPDATE: March 2023 – I am currently using DxO PureRaw instead of the full PhotoLab. It does the same with denoising and lens/camera corrections. I then adjust curves and levels with PaintShopPro as I had been doing prior to trying PhotoLab.

UPDATE: January 2023 – I wrote this article back in 2018, since then various programs have come on to the market that offer AI approaches to denoising photographs many of which are much easier to use and work really well. For example, the Topaz AI Denoise tool reduces noise and blur and can even reduce motion blur, as I demonstrated in an article with a photograph of a Peregrine Falcon flying overhead. DxO Photolab is my current denoise software of choice though, its DeepPrime system effectively lowers the ISO of any noisy photograph by the equivalent of about three stops (like shooting at 400 rather than 3200 but with the same shutter speed and aperture). It lens/camera corrections built-in too as well as allowing you to adjust levels, curves, saturation etc etc.


Noise can be nice…look at that lovely grain in those classic monochrome prints, for instance. But, noise can be nasty, those purple speckles in that low-light holiday snap in that flashy bar with the expensive cocktails, for example. If only there were a way to get rid of the noise without losing any of the detail in the photo.

Now, I remember noise in spectroscopy at university, you could reduce it by cutting out any signal that was below a threshold. Unfortunately, as with photos that filtering cuts out detail and clarity. So, a solution was to run multiple spectra of the same sample, like taking the same photo, you could then stack them together so that the parts that are of interest add together. You then apply the filter to cull the dim parts, the noise. The bits that are the same in each shot (or spectrum will be added together, but the random noise will generally not overlap and so will not get stronger with the adding. The low-level filtering then applied will remove the noise and not cut the image. No more ambiguous spectral lines and no more purple speckles. That is in theory, at least. Your mileage in the laboratory or with your photos may vary.

De-noising by stacking together repeat frames of the same shot comes into its own when doing astrophotography where light levels are intrinsically low. Stack together a dozen photos of the Milky Way say, the stars and nebulae add together, then you can apply a cut to anything that isn’t as bright as the dimmest and you can reduce the noise significantly. Stack together a few hundred and your chances are even better, although you will have to use a system to move the camera as time goes on to avoid star trails.

Then it’s down to the software to work its tricks. One such tool called ImageMagick has been around for years and has a potentially daunting command-line interface for Windows, Mac, and Unix machines, but with its “evaluate-sequence” function it can nevertheless quickly process a whole stack of photos and reduce the noise in the output shot.

As a quick test, given it’s the middle of the afternoon here, I went to my office cupboard which is fairly dark even at midday, and searched out some dusty copies of an old book by the name of Deceived Wisdom, you may have heard of it. I piled up a few copies and with my camera on a tripod and the ISO turned as high as it will go to cut through the gloom, I snapped half a dozen close-ups of the spines of the books. The first photo shows one of the untouched photos, with a zoom in on a particularly noisy bit.

Next I downloaded the snaps, which all look essentially identical, but each having a slightly different random spray of noise. I then ran the following command in ImageMagick (there are other apps that will be more straightforward to work with having a GUI rather than relying on a command prompt. Nevertheless, within a minute or so the software has worked its magic(k).

magick convert *.jpg -evaluate-sequence median book-stack.jpg

And, so here’s the result, well the zoomed in area of the composite output photo, the average of the six essentially identical original frames with the noise filtered to a degree from the combined image. There is far less random colour fringing around the letters and overall it’s crisper. The next step would be to apply unsharp masking etc to work it up to a useful image.

It’s not perfect, but there is far less noise than in any of the originals as you can hopefully see. The software you use can have fine adjustments, but perhaps the most important factor is taking more photos of the same thing. That’s probably not going to work at that holiday cocktail bar, but with patience should work nicely for astro shots. Of course, if I wanted a decent noise-free photo of my book, I could have taken them out of the cupboard piled them on my desk, lit them properly, used a flash and diffuser and what have you and got a really nice photo with a single frame. But, then what would you learn from me doing that other than that I still have copies of my old book?

Feeding on the fat balls

I have various bird feeders in the garden: a tube with nijer seeds, one with mixed seeds, another that usually has flavoured suet pellets and then the fat ball feeder. There’s also a plinth with a water dish. Now, the fat ball feeder attracts the House Sparrows (Passer domesticus) in droves (they also go for the nijer and the mixed seeds). Similarly, the Starlings (Sturnus vulgaris). Blue Tits (Cyanistes caeruleus), Great Tits (Parus major), and quite recently a Coal Tit (Periparus ater) will all peck at these agglomerations of fat and seeds.

Recently, an over-wintering pair of Blackcaps (Sylvia atricapilla) have also been dining at this feeder. The word on the wing is that Blackcaps from Eastern Europe and Germany have become disorientated en route to Iberia and Africa in the winter and fly a bit too much to the West and not enough to the South, and then finding a decent food supply in many British gardens they set up a winter home here. Interesting that this male is staring right at the camera, which I put on a tripod and operated wirelessly from indoors, well out of sight.

Meanwhile, Robins (Erithacus rubecula) tend to be ground-feeding birds, so it seems odd that they are on the fat balls too, but having watched their behaviour it seems they are not eating from the feeder, but simply breaking chunks off and then hopping on to the grass to pick up the pieces. A pair is in our garden at this very moment, doing just that.

Drugs from witches’ butter

Spotted some globular orange fungus growing on a dead, but still attached, branch of a tree in our local woodland. I asked friends if they could identify it, one (Alan Cann) suggested it was yellow brain, but there are two types and he’d need a micrograph to ID it definitively.

Tremella mesenterica (yellow brain, golden jelly fungus, yellow trembler, and witches’ butter is a common jelly fungus). Closely resembles Tremella aurantia (golden ear). T. mesenterica but has basidia which are stalked instead of sessile (this would be the bit you’d need the microscope for) and it parasitizes the mycelium of Stereum hirsutum rather than Peniophora.

Anyway, lots of research into carbohydrates produced by the fungi with biological activity and potential to treat diabetes and perhaps even immune system problems. More information on that here and elsewhere in the scientific literature. Oh, by the way, top left in the photo, tail of modern Canis familiaris.

Calibrate your lenses for sharper shooting

I was given a nice 1:1 macro lens for Christmas (Tamron, 90mm f/2.8). It was giving excellent results out of the box, but having realised that my DSLR does allow one to tweak the autofocus micro adjustment in-camera. I thought I would calibrate it as I had with my 600mm Sigma zoom (albeit that was done off-camera with a USB adapter). There’s a much easier way to verify that your lens isn’t back focusing or front focusing with lenses of shorter focal length as you don’t have to be so far away from the calibration targeting; at least 50 times focal length, which for a 600mm lens is 30m but for a 90mm lens is just 4.5m. I also opted for the moire fringing method described here.

Basically, you set your camera on a tripod, manually focus in Live View on a pattern on your computer screen, then switch to autofocus in the viewfinder and watch how much and in which direction the focus ring moves to “focus”. Your camera may be front or back focusing and for most DSLRs above the prosumer level from Canon and Nikon you can micro adjust this to fix it and make the AF sharper. If I remember rightly, my DSLR will remember micro adjustment settings for 42 different lenses, which is an order of magnitude than I possess so plenty of data slots.

The bottom line is that if your camera allows you to, you should calibrate your lenses in-camera. There will almost always be tiny discrepancies between what the camera thinks the lens is focused on and what it is actually focused on forward or back. My 50mm prime lens needed a -2 adjustment, whereas the Tamron macro needed +10 (out of a range of -20 to +20). This was sufficient to bring the lenses up to snuff. With these adjustments, there is no focus ring movement from manual focus to autofocus. They’re calibrated.

It’s going to be harder to calibrate the big zoom lens as our garden is a lot less than 30m even across its diagonal and I also don’t fancy the chances of the camera nor a laptop with the moire pattern in this rain, so I’ll leave all that for another day.

Meanwhile, here’s another macro shot of the poinsettia cyathia, this time carried out with focus bracketing. It’s a useful technique, but I can see some artefacts where the leaves and/or camera moved ever so slightly between frames. Or, it’s just a side effect of the way Picolay works with a focus stack of images.

These micro-adjustments and calibration can make only a tiny and sometimes barely perceptible difference to sharpness at 100%, but useful if you’re going to enlarge or do a really tight crop. Of course, given the awful compression websites like Facebook apply when you upload to them, it might seem pointless. Indeed for some uploads, it’s probably fine to just apply an unsharp mask to areas of interest in a photo. But, given that the micro-adjustments are relatively easy to do, I’d say do them anyway.

Focus on everything in your macro close-ups

UPDATE TO ANOTHER UPDATE: The Canon utility was hopeless, luckily I found a bit of open source software that takes back control much better and used it to focus stack yesterday morning’s moth and then combine the images, to much better effect.

ANOTHER UPDATE: It seems that the Canon EOS Utility should allow me to automate the process focus bracketing with my 6D…just installing and will test with tomorrow’s moth…assuming there’s another stunning species to photograph…may give it a miss if it’s just another Clouded Drab.

UPDATE: Been taking another look at this and applied focus stacking to my latest moth photo. There are several programs for focus stacking (Photoshop has it built in), Helicon Focus, Zerene Stacker, Picolay, and CombineZP (there are many others just search for focus stacking software). There’s also a tool for Canon dSLRs, DSLR Bracketeer, that lets you do the focus bracketing automatically and then you do the stacking in an app of your choice. There’s also a tool that lets you do the focusing on a bigger screen, like a tablet or computer, CamRanger, but you need a wireless tethering device. (Then there are camera rails!)

A narrow depth of field (DOF) has its pros and its cons in photography. Portraits often benefit from a nice sharp focus on the subject’s eye, but everything out of the plane of the face being out of focus so that backgrounds are blurred. In landscapes, the opposite is often required: foreground, middle ground and distance all needing to be nice and sharp (depending on your artistic wont, of course).

Fundamentally, DOF depends on the focal length of the lens, where you focus it and more importantly the f-stop you choose. The f-stop is the size of the aperture, essentially the hole that lets light into your camera. f-stop is given as a fractional ratio to the lens’ focal length of the maximum size it can be opened. So, f/2.8 is a big hole letting in lots of light (and needs to be balanced against a shorter shutter speed and/or lower ISO to get a properly exposed shot). Conversely, f/22 is a smaller hole and lets in far less light so requires a longer shutter speed (see my starburst article for diffraction effects possible with such an f-stop).

A larger aperture (smaller f-stop number, meaning a bigger fraction of the maximum size) means more light but a shorter DOF. This is part of the reason why things look blurry under water – there’s less light and so the pupils of your eyes open wider meaning a shorter DOF for your vision. Children who spend a lot of time swimming underwater without goggles can grow accustomed to the light levels and find that their pupils narrow and they can see sharper detail. I wrote about this effect among the Moken people for Discovery Channel back in the day.

Anyway, when you’re shooting close-ups of flowers and insects and such DOF becomes a real issue. With a 1:1 macro lens you are hoping to get the most detail possible but if the lens is within a few centimetres of the subject, then parts of the subject a few millimetres in front or behind your focus will not appear sharp. A top-notch lens with the possibility to shot with a slightly smaller aperture, provided there is sufficient light and without pushing the ISO to noisy high levels might get around the problem. But, there is another way.

You can focus stack your subject. Bracketing the point of focus from the closest to the farthest points on the object of your photographic desire. This is akin to creating genuine HDR (high dynamic range) photos where you expose for the dark, the mid-tones, and the highlights, stack the images together and create a composite that is neither under- nor over-exposed on any of those regions. Focus stacking brackets the focus and creates a composite.

There are plenty of HDR apps available, indeed some cameras and smartphones have an HDR mode that takes a series of photos very quickly one after the other with the bracketed exposures, stacks them together and erases the areas that are too dark or too bright, to give an even exposure. Works wonderfully in cathedrals when photographing the knave and altar and bright stained-glass windows in a single shot.

There are fewer “apps” for focus stacking, but there are some available (as discussed here). I found a piece of software called Picolay, which seems to do a nice job. It has lots of settings, but you can let it run on autopilot. You take a series of photos with the focus at different points on your subject (preferably done with a tripod and remote shutter to make them as near identically positioned in the frame as possible, focus aside).

You load the focus bracketed photos into the software and hit “go”. It calculates where the sharpest regions are in each photo, stacks them all together and essentially erases areas that are not sharp, giving you a composite that has an apparent DOF much greater than has any of the individual photos in the stack.

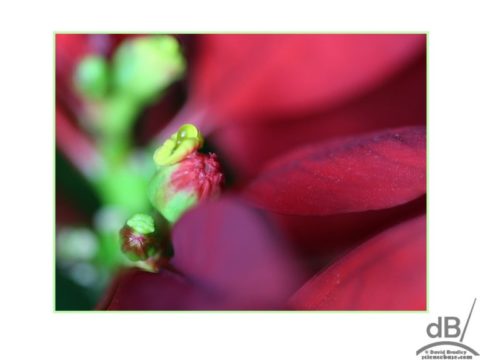
I plucked a crumpled leaf from our grapevine, set it up on a black plinth, put the camera on a tripod close to the leaf and moved the latter to frame it nicely. I then manually focused the macro lens on different areas of the leaf and snapped a dozen or so shots.

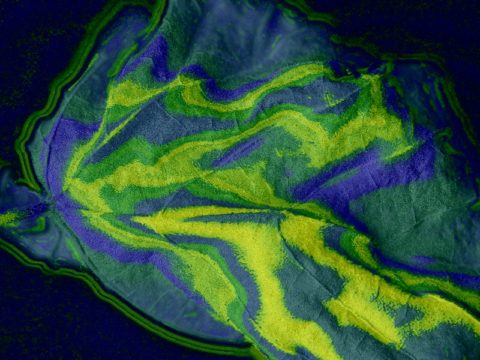
The shot below shows the software’s analysis of the stack of photos, I am assuming brighter colours meshes with sharper focus.

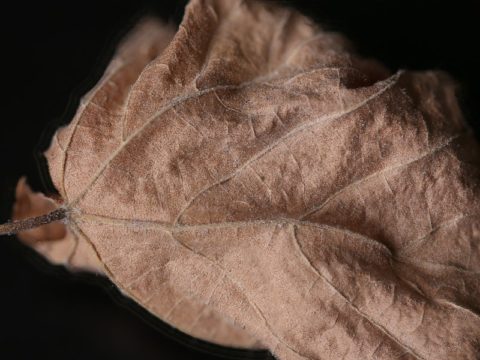
The following shot shows the processed stack, where much more of the leaf is in focus compared with any of the individual photos.

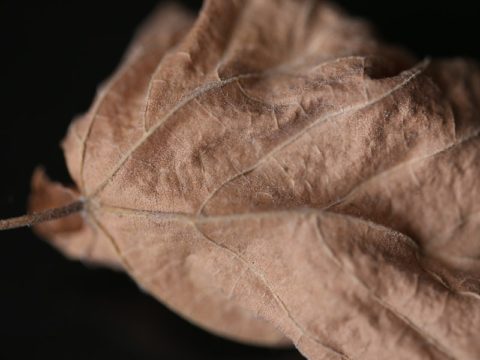
Here’s a photo of the leaf in which I’d focused on the upper portion of the frame rather than the main vein

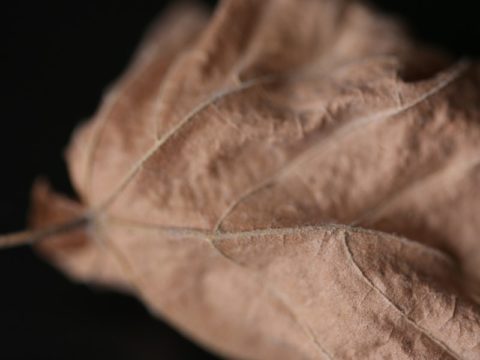
And, here’s one where the main vein is in focus, you will notice that neither of these shots is wholly sharp, whereas the stack above looks mostly crisp across the whole frame.

It’s not perfect and there are artefacts where the frames didn’t match perfectly. I did the experiment quite quickly. For a proper photo shoot, I’d spend more time setting things up just right and probably use a diffuse light source and maybe I ring-flash (which I’d have to buy first!). Ensuring each source photo is pin sharp each region of focus is vital. The potential is there. I suspect, and I haven’t checked, but some smartphones with multiple cameras and such probably have such focus stacking built in and ones that supercede the Lytro focus-free camera can presumably take this to the next level.

A year of bird photography

It’s a year since I first stepped out into the world of birds with a big Sigma lens (150-600m). First day out snapped a kingfisher that had been hanging around the Cottenham Lode . I’ve snapped 130 different bird species since, including herons, raptors, cuckoos, summer migrants, warblers, waders, seabirds, and even the occasional owl.

Scrollable gallery of choice snaps here: https://imagingstorm.co.uk/british-birds although you may notice I got ever so slightly better with tweaking my settings as the months went by. Earliest shots are at the bottom of the long table.

Pictured above from top left to bottom right: Robin (Erithacus rubecula), Long-tailed Tit (Aegithalos caudatus), Reed Warbler (Acrocephalus scirpaceus), Peregrine Falcon (Falco peregrinus), Barn Owl (Tyto alba)

Are false flowers like fake news?

The poinsettia (Euphorbia pulcherrima), a Mexican spurge @Mrs_Sciencebase kindly provided for my office to cheer the place up in the weeks before Christmas is still in leaf (the plant, not Mrs Sciencebase). It is also still producing its tiny little flowers, which aren’t actually flowers, they false flowers, more properly known as cyathia.

I took my macro lens to it earlier today. Tamron SP 90mm of/2.8 on a Canon 6D and got as close as I could to a cluster of those cyathia. The dewdrop on what I assume is actually the male part of the cyathium is presumably nectar, being secreted by the nectar gland. Nice piece about this plant here, includes lots more detail and close-ups.