Morning Moon

The moon is still fairly high in the sky this morning. It’s in the Third Quarter phase, also known as the Last Quarter Moon. This phase occurs about three weeks after the New Moon and is so-called because the Moon is three-quarters of the way through its orbit around the Earth, in case you were wondering, because obviously it looks like “half a moon”.

The Moon will have risen at about midnight last night from the eastern horizon and will set in the west at about midday. Next New Moon will be 15th February.

Super blue blood moon

The Moon is up, the sky is still blue, but our eyes have a higher capacity to cope with the dynamic range from the blue to the light than a camera can do…

Anyway, here’s a quick snap of the Moon this evening, it’s waxing gibbous, 94% of the way to full illumination and heading for a Super blue blood moon on Wednesday when it will not only be closest to Earth in its orbit and full (super), second full month in the same month (blue, not as rare as you think), there will also be a lunar eclipse so will look ruddy through backscattering of Earthshine in red wavelengths (blood), although the lunar eclipse will not be seen from the British Isles, so don’t go looking. Nothing to do with astrology, everything to do with astronomy and partly to do with calendar accidents. That said, blue used to be not just the second full in the month, but second in a calendar (church) period.

Meanwhile, camera settings for this shot:

f/5.6
t 1/500s
ISO 100
Focal length 600mm
Cropped from 5472×3648 original to 1087px square

Shoot for the Moon

Executive summary for moonshots with an SLR and a telephoto lens

Pick a cold, clear night, when the moon is in the sky.

Set up your camera and lens on a sturdy tripod outside. Let the kit acclimatise before shooting.

Use the longest focal length lens you have available to fill the frame with mostly moon.

Use the camera’s shutter timer or a remote shutter control.

Use LiveView or the equivalent to reduce vibration from the moving mirror.

Use a fast shutter speed, at least 1/180s.

Find your lens’ optimal small aperture, commonly sharper photos are at about f/8, but it does vary. This is about quality rather than depth of field.

Set the ISO as low as possible to reduce image noise but to allow a decent exposure. I’d say ISO 640 is the upper limit.

Shoot RAW to give you all the data to allow you to get the best image in post-processing.

Use a photo editor to crop to taste, adjust levels, boost contrast, and sharpen your photo.

If you’re sharing it on social media, make a copy of the final processed photo as a JPEG (85-90% quality) and resize it to 1024 pixelwidth, apply a touch more sharpening to that, add your logo/watermark, save, and share.

TL:DR

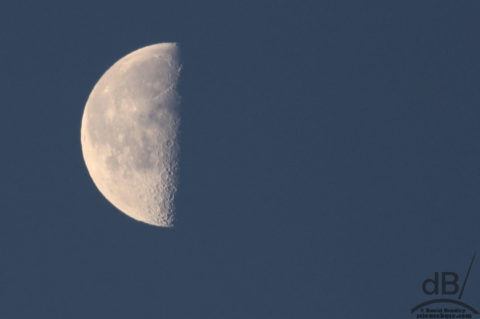
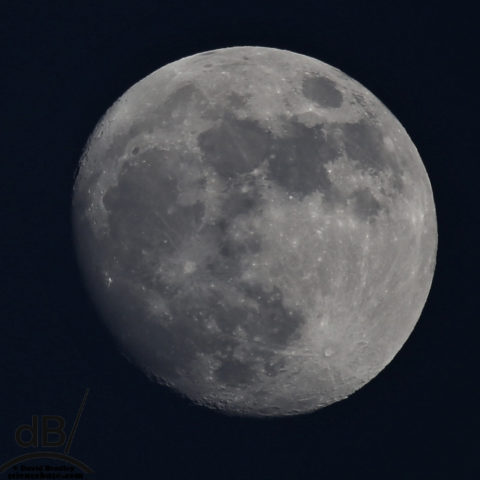
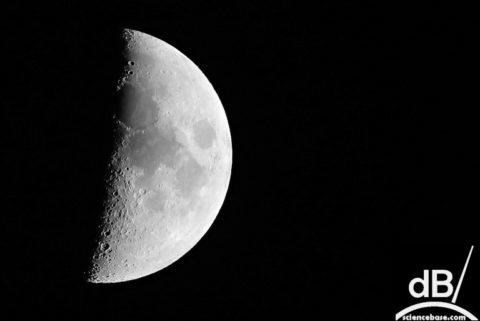
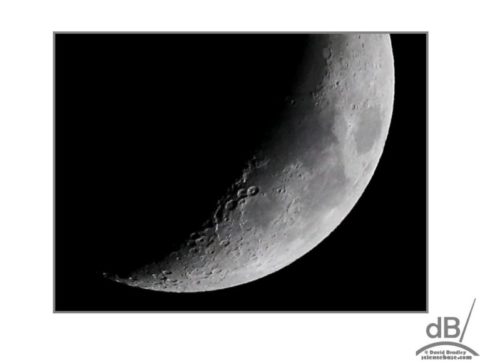
Use as long a zoom lens as you have access to. A sturdy and stable tripod and a remote shutter control. If you don’t have a shutter control, use timer mode and set it to 10 seconds to give the camera time to settle after your press the shutter. You need to choose a fairly still and clear night (cold and low humidity will give the best “seeing” as astronomers say. Unless you really want a full moon, go for a waxing or waning gibbous or a crescent and you’ll get those terminator craters and mountains. Also, full moon is brighter and harder to control exposure, although it definitely can be done.

I shoot with a Sigma 15-600mm zoom on a Canon 6D (later a 7Dii). Set your ISO to around 1000 (I try to go for about 640 on the 7Dii), opt for shutter priority 1/1000s, aperture left to its own devices but f/6.3, and EV it up a few notches +0.7, say but check your exposure with each shot and adjust accordingly (I’ve not found EV was any use on the 7Dii). Opt for single-point autofocus on the craters towards the dark edge but where there is still sunlight or use Live View mode instead of your viewfinder and manually focus. I’d recommend Live View mode or the equivalen on your brand regardless.

I generally crop in quite tight and enhance contrast using curves or levels ever so slightly to make sure the black sky is black but without losing too much detail at the edge of the moon. Also a little bit of unsharp masking on luminance only doesn’t go amiss, but don’t overdo it or your moon shot will look faked. There are many more sharpening tools, such as Topaz Sharpen AI that have appeared since I wrote this article, they can give your photo a boost. Also Topaz Denoise AI.

Photographing the Orion Nebula

UPDATE: Revisited the photos I took early in 2018 of the Orion Nebula and did some “levels” adjustments to get a better view. This particular shot was snapped at 600mm zoom (Sigma 150-600 lens) on a Canon 6D. F/6.3, 0.8 seconds exposure, ISO 3200.

The constellation of Orion is best visible in the Northern hemisphere during crisp and clear winter nights. It’s very prominent with its four “corner” stars (top two Orion, the hunter’s shoulders, bottom two the hem of his skirt) around the three-in-a-line belt and the dangling sword.

With the camera on a tripod and various lenses set to shutter speeds based on the rule of 500 I mentioned previously (precludes star trails), I had a go at photographing this constellation and then zooming in on that sword of his, which harbours the Orion Nebula. You will have to read the earlier post if you want more details about what settings to use for stellar photography.

It was a clear night last night and the moon had not yet risen, so I switched off all the house lights and ventured into our back garden with camera, tripod and shutter release. I didn’t quite get a low-noise sharp photo even with my Sigma 600mm zoom, but I did get something. I will try again on the next clear night while Orion is still riding high.

Constellation of Orion, sword showing nebula

That splodge in the middle of Orion’s sword is a glowing cloud of gas and dust some 1,344 lightyears from Earth (give or take 20 ly). It is the brightest nebula in the night sky and visible to the naked eye and the closest region of mass star formation. It is a star nursery where gravity pulls together that dust and gas over the course of millions of years into new stars.

How to photograph a meteor shower

My good friend Paul Sutherland alerted his Facebook cohort to the upcoming spectacle of the Geminid meteor shower. My immediate thought was what settings do I need to use with my camera having dabbled with astrophotography earlier this week. Thankfully, Suthers has me covered and saves me from having to write a full “HowTo”. Check out his guide to photographing a meteor shower here.

As with astrophotography, you will need a camera on a nice sturdy tripod. The camera must have the ability to control shutter speed and to have a time delay or a remote shutter control/cable release. It also needs to have a manual focus option.

So, what are we going to snap? The Geminids, that’s what. The Geminids are fragments of the object 3200 Phaethon which is probably a Palladian asteroid going around the sun in a “rock comet” orbit. Earth coincides with its path in December and those fragments that enter the atmosphere will burn up as “shooting stars”. Not due to friction but due to their high speed compressing the air in front of them and so heating it up to melting temperatures.

On a clear night, somewhere dark, away from streetlights etc, between December 4th and 17th (perhaps optimal will be 13th, 14th when they peak) point your camera on its tripod towards the constellation of Gemini. Use a wide angle. Live, manually focus on the stars. Set your ISO to between 800 and 1600. Widest aperture (smallest f-stop) possible and shutter speed based on the 500-rule to avoid capture motion of the stars due to Earth’s rotation. For a 20mm focal length, 500/20 = 25s maximum shutter speed.

At their peak, there will be a couple of shooting stars every minute from 10 pm onwards. Keep your eyes peeled, Once you’ve seen a few, you should be able to figure out their point of origin in that part of the sky in which the constellation Gemini lies. Adjust the angle and direction of your camera to capture the shooting star trails emanating from this point.

If you have a DSLR, there will likely be a cable release. If there’s an automated one you could set the camera up to fire a couple of times a minute all night and go to bed. It’ll keep shooting until the battery charge runs out. Some cameras will have Wi-Fi and an app that lets you control the camera via the internet and thus your smartphone, tablet, or PC. I’m just investigating as to whether the app for my Canon 6D lets one set up a scheduled regular shutter release so I can get a good night’s sleep while the camera does the work of watching the meteor shower.

NB Protect your camera from condensation and the weather outside and when you bring it back indoors.

Photographing the stars

I blogged and posted photos of starscapes I shot last on a chilly November night this week at about 11 pm. Here’s the executive summary for getting a sharp photo without star trails caused by Earth’s rotation. It was a clear night, but there was a quarter moon so not perfect conditions, best to shoot after moonset or when there’s a new moon. Also, make sure minimal domestic lighting on and away from streetlights. (Protect your camera from cold and damp if you’re outside for a long time and from condensation when you bring it back indoors).

Fix wide angle lens, e.g. 20mm-105mm or prime, to the camera.

Mount camera on a sturdy tripod, pointing up at the stars of interest. Milky Way, a constellation etc.

Set camera’s white balance to tungsten.

Open up the aperture as wide as it will go – lowest f-stop for the lens and camera. f.4.0 was what my Canon lens could manage at 20mm.

Set ISO to about 1600, but lower it, if you get a lot of purple speckly noise.

Make the shutter speed no slower than 500/focal length, for 20mm that would be 25 seconds. That avoids star trails. If brightest stars look too blown out, shorten the shutter time.

Manually focus.

Set a shutter time delay or use a cable release or app to take the shot.

If you can find somewhere dramatic, like a mountain range, all the better. I made do with the roofline of our houses as a context to the sky.

Thanks to Practical Photography magazine for initial stellar inspiration.

Stellar photography shoots for the stars

We’ve all seen those amazing shots of the Milky Way with some stunning vista, an enormous bridge, mountains, a rainforest…well, there’s not a lot of that around here but I fancied shooting the stars.

Basic things: you need a tripod, a remote shutter control or the ability to set a shutter release timer, and a fully manual camera with manual focus. It’s best to dial in the settings indoors before you step out into a chilly November night. Also, it’s best to choose a moon-free night and to be somewhere with low light pollution. Easier said than done, of course.

Anyway, set the white balance on the camera to tungsten for best results. Choose an ISO of about 1600 and an f-stop (aperture) as low as it will go (bigger aperture in other words). With my 24-105mm on my Canon 6D I could stop it down to f/4.

Now, here’s the science bit. Because you’re going to need a long exposure, several seconds to get a good exposure, the earth will have rotated a little bit during the exposure and the stars will look like short light trails. Now, you could make this a feature of your photo. Aim at the pole star and set a really long exposure and you will get those fancy circular trails. But if you want nice starry pinpoints, you need to use a rule of thumb to avoid light trails. The rule of thumb is to divide 500 by the focal length you’re using and that’s the maximum number of seconds you can expose before star trails will become apparent. I was planning to shoot at 24 mm focal length, so 20 seconds or less would be about right (as it turned out 15 seconds was best with the f-stop and ISO I’d set.

Set your camera up on the tripod, align it with a patch of sky you wish to photograph and manually focus to get the stars looking as sharp as you can (You might have to zoom in and focus unless there’s a particularly bright star in your patch of sky and then zoom out again without changing the focus). Set the camera to timer mode (10s works best rather than 2s, to let the camera settle after pressing the shutter release) or use a shutter cable or wireless remote.

Post-processing can boost a photo. Here’s one I took at the local church with a heavenly backdrop that reveals more of the stars

And, this one is a shot of the Orion Nebula.

Why has the sun gone red today?

Odd weather we’re having right now. It’s 23 Celsius outside, albeit with a stiff windchill. The wind is apparently down to the ex-hurricane we know as Ophelia. The heat…definitely not what you’d expect for mid-October, more like late July, but probably a jet stream phenomenon combined with that tropical storm pushing warm air towards us (here in the South of England, anyway; your mileage may vary).

But, it’s 3 pm and the sun is looking distinctly like it’s a sunset but too high in the sky. The fact that the cars are all covered in desiccated, dusty raindrops from last night suggests we’ve had a load of dust blow northwards from the Sahara Desert. A quick Google confirms this. That said, there are forest fires in Spain and/or Portugal that would also generate plenty of dust.

Ophelia has stirred up a storm and carried megatonnes of dust into the atmosphere of the British Isles and elsewhere. As we know from high school science lessons (you were listening, weren’t you?) tiny particles of dust in the atmosphere scatter light of different wavelength to different degrees. So, the blue end of the spectrum of the white light from the sun is scattered away from your line of vision while the lower energy red is scattered so little it passes straight to your viewpoint.

Anyway, the fat ol’ sun, the hurricane sun, above was snapped at 3 pm on my Canon dSLR with a 600mm lens #nofilter. (Sunset isn’t for another 3 hours).

All that desert/fire dust might also explain the sore eyes Mrs Sciencebase and myself are both suffering today.

UPDATE: 17:25, half an hour before sunset, this is how it looks:

A Brief History of the Moon

The Moon was in its first quarter phase earlier this week. Looking beautiful, hanging in the sky, at dusk. If I see it, I snap it. So, with my trust camera and a biggish lens (150-600m), I fired off a couple of shots. Cropped the image straight out of the camera to “zoom” in even further and to give the shot a nice composition, adjusted the histogram using curves in my photo editor, applied a little sharpening (actually an unsharp mask process) and a couple of other tweaks, just as one would in the darkroom with wet photography and an enlarger.

I posted the shot to social media and got a few complimentary comments and one sci-curious question from a physicist friend, Richard Gymer:

I reckon the smallest craters that I can see on your photo are about 20 km diameter, and the largest - that suspiciously round 'sea' - is over 600 km in size...

What did he mean by “suspiciously round”, I wondered:

The scientist in me looks at the way the craters are distributed and says, 'The largest craters are under smaller craters: maybe the distribution of size of objects landing on tyhe moon has changed with time? The most recent events have been getting smaller. And we know that crater formation is a (mercifully) rare event on Earth these days. When were these craters formed?

He wasn’t having an Archimedean “Eureka!” moment, but more of an Asimovian “That’s funny!”* I had a quick look for a NASA video showing the potted and pock-marked history of the Moon and found this nice evolution, showing its early cooling (when it should also be shown being bombarded), through the early, massive bombardment with large objects, and eventually bombardment with smaller asteroids and other objects, leaving the moon as we see it today. Who can remember the last time a large space rock hit the moon?

*By the way, nobody is sure whether the quote “The most exciting phrase in science is not “Eureka!”, but “that’s funny!” was Isaac Asimov, perhaps even Alexander Fleming, or neither.

Watch this video of an alien solar system

There is a star in the constellation of Pegasus that is 129 light years from Earth. It’s a young star, a mere 50 million years old (cf the sun is 4.5 billion years old (ish) This star, HR 8799, has planets, hot planets far bigger than Jupiter and Saturn that swing around it in vast orbits.

Scientists at the National Research Council of Canada’s Herzberg Institute of Astrophysics collected data from this distant solar system over the last few years and Jason Wang at the Nexus for Exoplanet System Science (NExSS) made the images into a “video”. You are looking at another solar system. This warrants an OMG on a cosmic scale. Jennifer Harrison waxed lyrical about this “footage” on twitter earlier so thanks to her for bringing it to my attention.

The orbits are not complete, of course, the scientists have only been watching the system since 2009. A year on the closest planet to the star lasts 40 earth years, the most distant planet takes 400 earth years to do a complete circuit.

OMG.